T-Shirt Stenciling Tutorial
Supplies:
- your image on normal paper
- contact paper
- scalpel or exacto knife
- cutting surface
- scotch tape
- prewashed and dried t-shirt
- scrap cardboard
- fabric paint (like Tulip brand from craft store)
- sponge brush (very cheap at craft stores)
You'll also want to consider the amount of detail in the image and the number of shirts you'll want to make. This method creates stencils that are good for one use only. It allows a pretty good amount of detail and crispness, but it's limited by your cutting ability. It doesn't work so well for things like math equations that have a lot of thin straight lines (ask me how I know that). When I want to make more than one shirt, I use a embroidery hoop modpodge screenprint-like method. It takes a lot more time and you have to be handy with tiny paintbrushes. If you want to make a lot of shirts with a lot of detail, learn how to do real screenprinting with photo emulsion goo and let the light do the work for you.
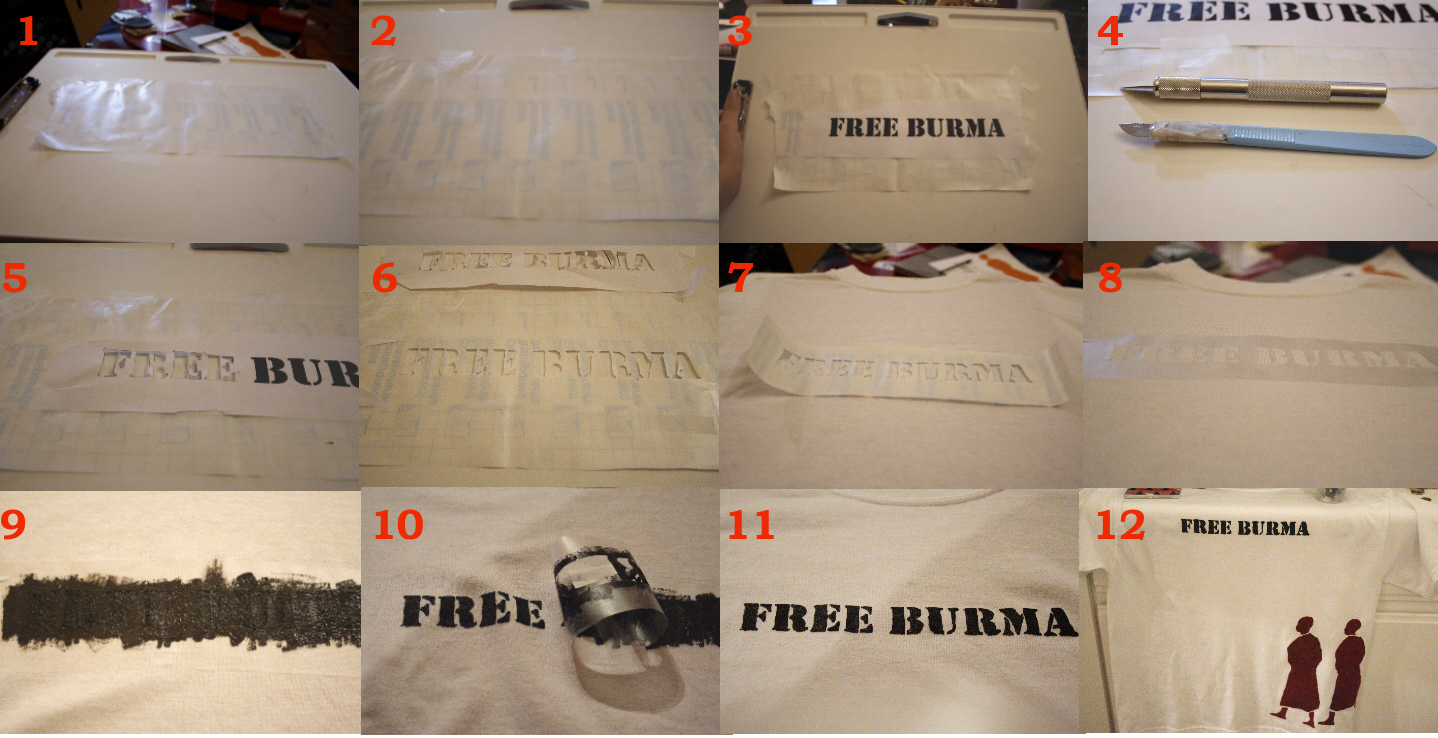
Step 1: If you're still interested after that huge disclaimer, cut a length of contact paper larger than your image and smaller than your cutting surface. You can use anything you don't mind scratching up as your cutting surface. I use an old lap desk.
Step 2: Tape the contact paper down to your cutting surface. Make sure the sticky side of the contact paper is down. That means the plasticky side will be facing you and the paper backing will be facing down.
Step 3: Tape your printed out image to the contact paper. You can use the grid lines on the contact paper to help you position the image.
Step 4: Acquire cutting materials. I usually use a scalpel from an old college bio dissection kit. The tape is to ensure I don't cut myself when I try to grip the scalpel close to the blade. Yes, I learned that the hard way. Most people use an exacto knife, but I usually find myself going back to the scalpel for detail work.
Step 5: Start cutting out your stencil using the printed image as a guide. Cut through all 3 layers until you reach your cutting surface- your paper image, the plasticky sticky part of the contact paper, and the contact paper's paper backing. I remove the waste as I go to make sure I've made it through all the layers. If your image has islands (like the middle of an o), save those pieces to use later.
Step 6: Remove the leftover printer paper that used to contain your image. Look at your new stencil and make sure there aren't any major mistakes.
Step 7: Remove the stencil from the cutting surface and trim the excess. You want enough of a margin so that you don't get unwanted paint going over the edge onto your shirt, but you don't want so much extra material that the stencil becomes unwieldy. Get our your prewashed t-shirt and put cardboard inside so ink won't bleed through. Smooth the shirt out over the cardboard so it looks nice. Experiment with positioning of the stencil on your shirt (or tote bag, or whatever). I usually line up text in the general vicinity of the shirt's armpits so I end up with the text on the upper chest.
Step 8: Peel off the stencil's paper backing from the bottom of the stencil. Make sure it doesn't stick to itself. Press the stencil onto the prepared shirt. Try to get the positioning right on the first try. I usually start at one edge and smooth the stencil onto the shirt so there are no wrinkles or bubbles.
Step 9: Dab your fabric paint onto the shirt with a foam brush. I usually squirt some paint out onto scrap cardboard for easy access. Make sure you cover all exposed shirt areas. It's not hard as you'll be able to see where the shirt meets the stencil.
Step 10: Peel the stencil away from the shirt. I usually let the paint dry for a couple of hours, but I don't wait until it's totally dry because I'm impatient.
Step 11: Wait 24 hours before you touch, wear, or wash the shirt. I don't iron the shirt, but you may need to if you're using screenprinting ink or something other than fabric paint. Follow your package directions.
Step 12: You're done! Enjoy! Your shirt should last pretty much forever. I haven't had problems with fading or anything like that.


Comments