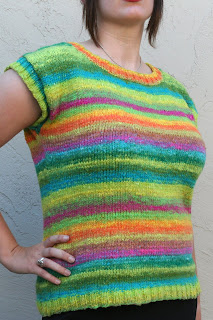
FO: Taiyo Top

Yarn: Noro Taiyo
Needles: US 8
Body Plan: sleeveless drop-shoulder, no shaping below the neckline/shoulders, knit flat and seamed
Ravelry details and more photos here.
It was my intention to blog throughout the design process, but I accidentally finished the sweater in a week and a half! I think it's still long and wide-necked enough to hint at 80s styles without looking dated. I wanted to keep the neckline practical and fuss-free to wear to work, so I measured bra strap distance and added 2 inches to allow for an inch of ribbing on either side.
I took Deborah Newton's awesome advice from Designing Knitwear and used a string to decide on a depth and general shape for the neckline. Trying to figure out the exact rate of shaping was driving me nuts. After staring at several reference books, I finally got out some knitter's graph paper, marked the width and depth, and sketched in the curves until I thought it looked ok. This turned out to be a perfectly fine way to do things. For the back neck depth and shoulder shaping depth, I just used about an inch. I shaped the shoulder with short rows in 3 chunks, and used a 3 needle bind off to seam the shoulders. I'll probably never do a stairstep bind off again. I had been worried about getting visible wedges from the short row shaping in self-striping yarn, but the number of rows was really trivial.
I used the new book Knitwear Design Workshop to sanity-check my shaping and math. It has promise to be an extremely useful book, but it was a little difficult for me to navigate. The first several chapters are detailed information and example calculations for several basic construction styles, then has separate chapters on alternate necklines, collars, sleeves, etc. at the back. I had to do a lot of flipping back and forth. The Deborah Newton book is a little less about the math (though it has plenty of info) and more about aspects of fit and how to make decisions about them. It has a ton of tips and suggestions that she learned the hard way.
I also looked at Knitting in the Old Way. It had example schematics with percentages for many different neckline styles. I thought this was perfect, and would be really easy to use. When I used the percentages, I got some pretty nonsensical results. The chapter I was in didn't exactly say percentage of what. I thought it was referring to the stitch count all the way around the bust, as in EZ percentage systems and earlier chapters in the same book. Now I think perhaps it was referring to percentage of cross-back width.
In fact, that was a recurring problem with several reference books because I didn't have a cross-back width. As a sleeveless drop-shoulder garment, there was no armhole shaping at all. It was silly of me to try to go by guidelines anyway, but I have a habit of wanting to do things the "right" way. Going by measurements is always the best, and I already extolled the benefits for using a string to experiment with necklines.
I kept an eye on the stripes to make sure they mostly lined up on the front and back. I made sure that the new ball I attached for one side of the neck matched the color sequence on the other side of the neck. I didn't worry about the stripes in that area being twice the depth of the stripes on the back of the garment. It was such a small depth that it isn't really noticeable.
In retrospect, I might make the back narrower than the front or put vertical darts on either side of the back waist, but I'm fine with it as it is. I wanted something comfortable and modest for work that was also simple to knit. I used a slightly loose gauge to get some drape so it wouldn't look too boxy.


Comments
Thank you for the lovely compliment. That string on the neck trick ALWAYS works and I have relied on it for my designing for years!
I am working on a new book now, for Vogue Knitting, called FINISHING SCHOOL, which is about-- guess what? I hope you find that book useful too when it comes out.
All the best, and happy knitting and designing,
Deb Newton